第10章:Ports & Adapters超入門(interfaceで“外を差し替え”)🔌🧱
この章でできるようになること 🎯✨
- 「Ports(ポート)」と「Adapters(アダプター)」が何者か、ひとことで説明できる 🙆♀️💡
- “内側”が 外部APIの都合に振り回されないように、
interfaceで境界を作れる 🛡️🌊 - テストで外部APIを差し替えできる(=速い・安定・安心)🧪⚡
1) まずはイメージ:Ports & Adaptersってなに?🧠💭
Ports & Adapters(別名 Hexagonal Architecture)は、ざっくり言うと…
アプリの中心(=内側)を守るために、外の世界(DB・外部API・UI)を“差し替え可能”にする設計 🔁🧱
もともとの考え方は Alistair Cockburn が提唱した Hexagonal Architecture(Ports & Adapters)に由来するよ📚✨ (alistair.cockburn.us)
2) ざっくり図で理解しよ!🖼️✨
イメージはこんな感じ👇(超ざっくり)
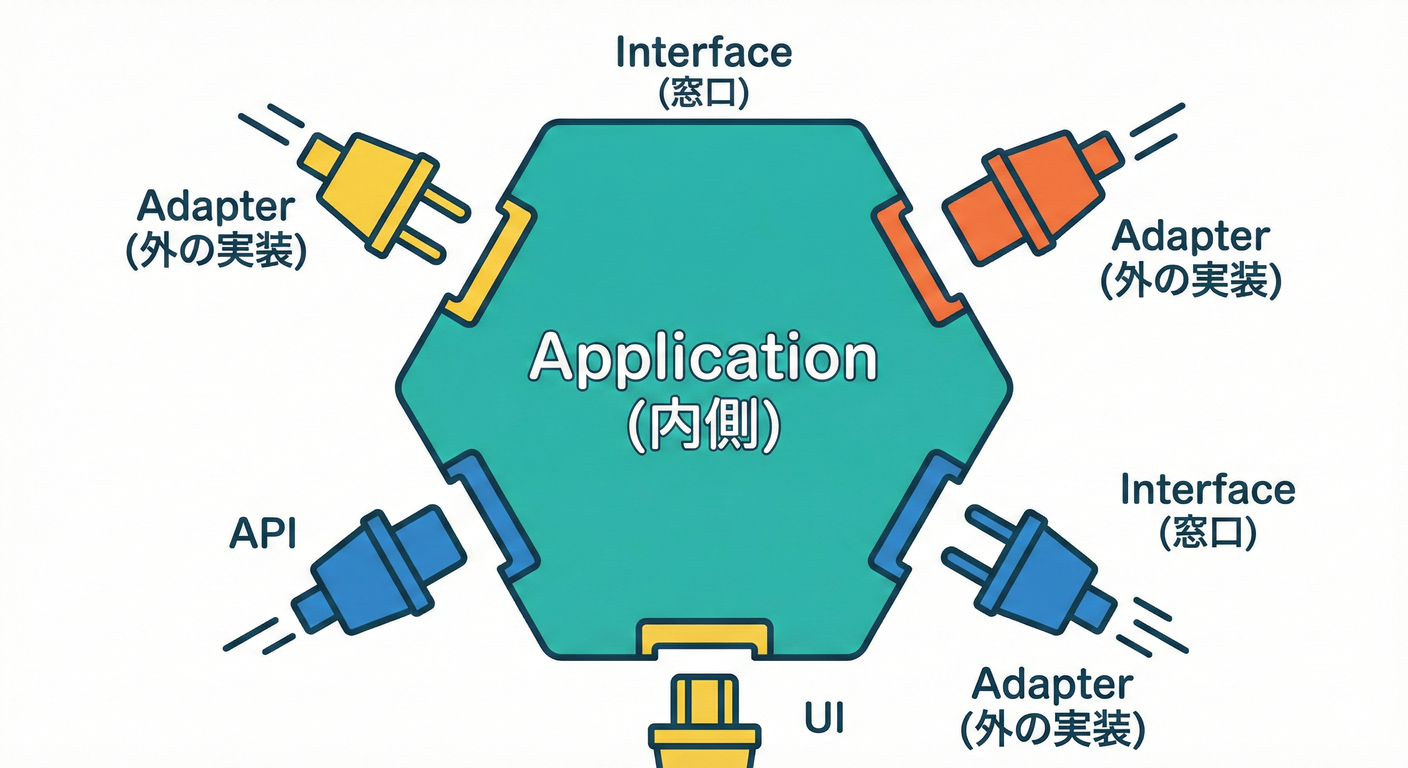
- 内側(ドメイン/ユースケース):自分たちのルール 📘✨
- 外側(外部API/DB/UI):相手の都合 🌍💦
- 境界(Ports):内側が外にお願いする“窓口” 🔌
- 変換係(Adapters):外の都合を受け止めて、内側の形に合わせる翻訳係 🗣️➡️📘
3) Ports(ポート)=「内側が要求する“できること”」🔌✨
ポートは interface で作るよ! ポイントはこれ👇
-
ポートは 内側に置く(Application/Domain側)🏠✨
-
ポートは 「何がしたいか」だけを書く(どうやるかは書かない)✍️
-
ポートの戻り値や引数は 内側の型(ドメイン型) にする 📘✅
- 外部DTOを混ぜると、境界が壊れやすくなる 😇🕳️
4) Adapters(アダプター)=「外部APIを“ポートの形”に合わせる」🧱🌍
アダプターは 外側に置くよ(Infrastructureとか)📦 やることはこの3点セットになりがち👇
- 外部APIを呼ぶ 🌐
- 外部DTOを受け取る 📦
- ドメイン型に変換して返す 🔁✨(ここがACLの主戦場!🧼🛡️)
5) 例題:学内アプリの“外部を差し替え可能”にする 🎓🍱
ここでは「学生情報」と「決済」の2つの外部を想定するよ。
- 学生情報:
StudentDirectoryPort(学生を探せる)🔎 - 決済:
PaymentPort(支払いできる)💳
フォルダ構成(最小)📁✨
src/domain:ドメイン型(VO/Entity)📘src/application:ユースケース(内側の流れ)🎬src/application/ports:ポート(interface)🔌src/infrastructure/adapters:外部APIアダプター 🧱🌍src/main:組み立て(DIする場所)🧩
6) コードでやってみよう:ポートを作る 🔌🧠
6-1) ドメイン型(超ミニ)📘✨
// src/domain/StudentId.ts
export class StudentId {
  private constructor(public readonly value: string) {}

  static of(value: string): StudentId {
    const v = value.trim();
    if (v.length === 0) throw new Error("StudentId must not be empty");
    return new StudentId(v);
  }
}

// src/domain/StudentProfile.ts
export type StudentProfile = {
  id: StudentId;
  name: string;
  grade: "UNDERGRAD" | "GRAD";
};
6-2) ポート(interface)を定義する 🔌✨
// src/application/ports/StudentDirectoryPort.ts
import { StudentId } from "../../domain/StudentId";
import { StudentProfile } from "../../domain/StudentProfile";

export interface StudentDirectoryPort {
  findById(id: StudentId): Promise<StudentProfile | null>;
}
決済側も同じ感じ👇
// src/domain/Money.ts
export class Money {
  private constructor(public readonly yen: number) {}

  static yen(value: number): Money {
    if (!Number.isInteger(value)) throw new Error("Money must be integer yen");
    if (value <= 0) throw new Error("Money must be positive");
    return new Money(value);
  }
}

// src/domain/PaymentResult.ts
export type PaymentResult =
  | { ok: true; authorizationId: string }
  | { ok: false; reason: "DECLINED" | "TEMPORARY_UNAVAILABLE" };

// src/application/ports/PaymentPort.ts
import { StudentId } from "../../domain/StudentId";
import { Money } from "../../domain/Money";
import { PaymentResult } from "../../domain/PaymentResult";

export interface PaymentPort {
  charge(studentId: StudentId, amount: Money): Promise<PaymentResult>;
}
💡ここで大事なのは、外部APIの型(DTO)を一切出さないことだよ 🧼✨
7) ユースケース(内側)は“ポートだけ”を使う 🎬🔌
// src/application/ChargeLunchPointsUseCase.ts
import { StudentDirectoryPort } from "./ports/StudentDirectoryPort";
import { PaymentPort } from "./ports/PaymentPort";
import { StudentId } from "../domain/StudentId";
import { Money } from "../domain/Money";

export class ChargeLunchPointsUseCase {
  constructor(
    private readonly studentDirectory: StudentDirectoryPort,
    private readonly payment: PaymentPort
  ) {}

  async execute(input: { studentId: string; amountYen: number }) {
    const studentId = StudentId.of(input.studentId);
    const amount = Money.yen(input.amountYen);

    const student = await this.studentDirectory.findById(studentId);
    if (!student) {
      return { ok: false as const, reason: "STUDENT_NOT_FOUND" as const };
    }

    const pay = await this.payment.charge(studentId, amount);
    if (!pay.ok) {
      return { ok: false as const, reason: pay.reason };
    }

    return { ok: true as const, authorizationId: pay.authorizationId };
  }
}
✅ ユースケースは HTTPもJSONも知らない ✅ だから外部が変わっても、内側は壊れにくい 🛡️✨
8) アダプター実装:外部APIを“ポートの形”に合わせる 🧱🌐
ここでは「外部API呼び出し部分」は簡略化して、変換の入口だけ見せるよ(詳しいマッピングは次章以降でガッツリ🔥)
// src/infrastructure/adapters/StudentDirectoryApiAdapter.ts
import { StudentDirectoryPort } from "../../application/ports/StudentDirectoryPort";
import { StudentId } from "../../domain/StudentId";
import { StudentProfile } from "../../domain/StudentProfile";

type ExternalStudentDto = {
  student_id: string;
  full_name: string;
  grade_code: "1" | "2"; // 例:謎コード
};

export class StudentDirectoryApiAdapter implements StudentDirectoryPort {
  constructor(private readonly baseUrl: string) {}

  async findById(id: StudentId): Promise<StudentProfile | null> {
    const res = await fetch(`${this.baseUrl}/students/${id.value}`);
    if (res.status === 404) return null;
    if (!res.ok) throw new Error(`Student API error: ${res.status}`);

    const dto = (await res.json()) as ExternalStudentDto;

    // ✅ 外部DTO → ドメイン型に翻訳(ACLのコア!🧼🛡️)
    return {
      id: StudentId.of(dto.student_id),
      name: dto.full_name.trim(),
      grade: dto.grade_code === "1" ? "UNDERGRAD" : "GRAD",
    };
  }
}
9) “差し替え”はどこでやる?(Composition Root)🧩✨
「どのアダプターを使うか」を決めるのは、**一番外側(main)**でOK🙆♀️ ここが手動DI(依存を手で注入する)ポイントだよ🪡✨

// src/main/index.ts
import { ChargeLunchPointsUseCase } from "../application/ChargeLunchPointsUseCase";
import { StudentDirectoryApiAdapter } from "../infrastructure/adapters/StudentDirectoryApiAdapter";
// PaymentApiAdapterも同様に作る想定
import { PaymentApiAdapter } from "../infrastructure/adapters/PaymentApiAdapter";

const studentAdapter = new StudentDirectoryApiAdapter("https://example.com");
const paymentAdapter = new PaymentApiAdapter("https://pay.example.com");

const useCase = new ChargeLunchPointsUseCase(studentAdapter, paymentAdapter);

const result = await useCase.execute({ studentId: "A123", amountYen: 500 });
console.log(result);
10) ここが最高!テストがラクになる理由 🧪⚡
Ports & Adaptersのいちばんのご褒美はこれ👇
- 外部APIが落ちててもテストできる 💪✨
- テストが速い(ネット待ちゼロ)🚀
- 外部仕様変更に気づきやすい(境界で止まる)🚨
テストには Vitest が使いやすいよ(Viteベースの次世代テストフレームワークとして案内されてるよ)🧪✨ (vitest.dev)
10-1) Fake(偽物アダプター)でテストする 🧸🧪
// src/application/ChargeLunchPointsUseCase.test.ts
import { describe, it, expect } from "vitest";
import { ChargeLunchPointsUseCase } from "./ChargeLunchPointsUseCase";
import { StudentDirectoryPort } from "./ports/StudentDirectoryPort";
import { PaymentPort } from "./ports/PaymentPort";
import { StudentId } from "../domain/StudentId";
import { Money } from "../domain/Money";

class FakeStudentDirectory implements StudentDirectoryPort {
  async findById(id: StudentId) {
    if (id.value === "A123") {
      return { id, name: "Sakura", grade: "UNDERGRAD" as const };
    }
    return null;
  }
}

class FakePayment implements PaymentPort {
  async charge(_: StudentId, amount: Money) {
    if (amount.yen >= 1000) return { ok: false as const, reason: "DECLINED" as const };
    return { ok: true as const, authorizationId: "AUTH-001" };
  }
}

describe("ChargeLunchPointsUseCase", () => {
  it("学生が存在して、支払いOKなら成功する", async () => {
    const useCase = new ChargeLunchPointsUseCase(new FakeStudentDirectory(), new FakePayment());
    const result = await useCase.execute({ studentId: "A123", amountYen: 500 });

    expect(result.ok).toBe(true);
    if (result.ok) expect(result.authorizationId).toBe("AUTH-001");
  });

  it("学生がいないなら失敗する", async () => {
    const useCase = new ChargeLunchPointsUseCase(new FakeStudentDirectory(), new FakePayment());
    const result = await useCase.execute({ studentId: "NOPE", amountYen: 500 });

    expect(result.ok).toBe(false);
    if (!result.ok) expect(result.reason).toBe("STUDENT_NOT_FOUND");
  });
});
11) TypeScript(2026)での“実務寄り”メモ 🧠🧰
11-1) TypeScriptは「現時点の最新版」が 5.9 と案内されてるよ 🧷✨
インストール案内ページで “currently 5.9” と書かれてる 📌 (TypeScript)
11-2) Node向けの module 設定は“安定オプション”が増えてる ⚙️✨
TypeScript 5.9 のリリースノートでは、--module node20 の安定オプションが紹介されてるよ(nodenextのように挙動が揺れにくい方向)🧊✨ (TypeScript)
(「いきなりESMで沼る😇」を避けたいとき、こういう“安定モード”を選べるのは助かるやつ!)
11-3) NodeのLTS状況(2026年1月の一覧)📅
Node.js のリリース一覧では、v24 が Active LTS、v22/v20 が Maintenance LTS と表示されてるよ🧭 (Node.js)
12) よくある失敗あるある 😵💫🌀(先に潰そ!)
- ❌ ポートの引数/戻り値に外部DTOが混ざる → “内側”が外部に汚染されて、結局つらい 🕳️
- ❌ ユースケース内で
fetch()しはじめる → テスト不能になって涙目 🥲 - ❌ アダプターが「整形も検証も何もしない」 → “翻訳係”がサボると内側が壊れる 💥
- ❌
anyで雑に通す → バグを未来に先送りするやつ 😇📦
13) AI拡張(Copilot / Codex等)を使うときのコツ 🤖✨
使いどころ(めっちゃ相性いい)💞
- ポート(interface)の雛形生成 🔌
- Fake実装の量産 🧸
- テストケースの洗い出し 🧪📝
ただし注意(ここは人間の仕事!🧠🛡️)
- **ドメイン用語(内側の言葉)**がブレてないか
- エラーの意味が雑にまとめられてないか
- 境界で落とす/守る方針が守られてるか
14) ミニ演習 🎓✍️(やると理解が一気に進む!)
演習A:ポート設計 🧩
-
StudentDirectoryPortに「学籍番号で検索」だけじゃなく、 「メールで検索」を追加してみよう📩🔎- ただし 戻り値はドメイン型のまま!
演習B:差し替え確認 🔁
-
StudentDirectoryApiAdapterを使う代わりに、FakeStudentDirectoryを main で差し込んで動かしてみよう 🧸✨- 外部通信ゼロで動いたら勝ち!🏆
15) 理解チェック ✅📝
- Q1:Ports(ポート)には「何を書く」?(どうやるか?何がしたいか?)🤔
- Q2:ユースケースが
fetch()を直接呼ぶと、何がつらい?😇 - Q3:外部DTOを“内側の型”に変える責任はどこに置く?🧼🛡️
まとめ 🌟
- Ports = 内側が要求する interface 🔌✨
- Adapters = 外側をポートに合わせる翻訳係 🧱🗣️
- これで「外部を差し替え可能」になって、テストが爆速&安定になるよ 🧪⚡
- Hexagonal/Ports&Adaptersは「中心を外から守って、独立してテストできる」ことが狙い 📘🛡️ (AWS ドキュメント)